Saturday 31 March 2012

Week 8 - Dress 3


Material : 100% Polyester with a Polyurethane coating
Cost Per Meter : £5
Amount Used : 2.5m
Sourced From : Mermaid Fabrics , Hackney


This week it was my turn to buy the fabric again and we discussed in our group that we were to have something sporty. I showed a sample of Neoprene and everyone liked it. Due to the high cost of £25pm for Neoprene i found a suitable alternative at 1/5 of the price.

I really loved the fabric as it had a great weight to it so draped well, it didn't fray so hems could be left raw and it still look professional and also you could use both the shiny side (which i used) or the wrong side which was a matt finish.


After a quick lesson from my boss at work about Korean Pattern Cutting and how that every pattern piece is drafted from basic shapes such as squares and circles i decided to embrace this new technique.

From playing around with the lines and measurements on my pattern i decided to create a pattern with no side seam ( which in everyday life you don't normally see) and just shape the center back seam. this led to having a slight point in the seam at the chest/waist/hip point. I thought this would look ugly when finished bus as the picture below shows the points and excess fabric creates these great crease lines.

Another feature that i really love about this jacket is that the point in the back seam at the hip folds on its self to create the effect that its cut like a proper men's jacket with a flap. This illusion really gives it a masculine edge. 


In terms of fashion i think this is really stylish and chic and i could see people buying it in shops, whether it be Topshop, or Browns (made in a better fabric!!)

But there was one factor that i only found out after i had completed the jacket and that was that i should have used a Teflon coated sewing machine needle as it would have made sewing easier and the stitching even where i top stitched. But now i know this i can make it better next time


I noticed on a jacket i had (KTZ Linen Jacket - Posted earlier) that the inside seams were bound with bias binding. I thought this was an opportunity to add an accent colour and in my sewing box i found this lemon yellow cotton bias that was bought from Woolworths before i was born.


As i noticed with outer garments, they all have pockets, so to get more confident i repeated the same style of pocket from Skirt 1 (jetted/welt pocket) and using a contrasting white pocket bag just breaks up the block black colour. I think the Jet/Welt pocket detail will become a key feature in future garments for me as i really love the way they look and blend in.

Pattern Piece (NO SIDE SEAM!!!)

Monday 26 March 2012

Week 7 - Skirt 3

Material : Grey Jersey
Cost Per Meter : £4.50
Amount Used : 2m
Sourced From : Toni Textiles - Shepherds Bush


When i first got this material i immediately thought of old school jumpers and school uniforms which is not the look that i'd normally design with in mind. But i thought with this material it will drape well so i cut a full circle skirt and i took my waist measurement and divided it by 4 to get the shape. I totally forgot about the rules of circles and the use of Pi, so my waist ended up being 3 times the size of the actual measurement. 


 Improvising with the mess that i made, i was initially going to add pleats to the hem line to bring the fullness in but i thought that as it was grey and masculine, i would go with the theme of a kilt. So i added in pleats to the back section to bring it back to the right size. Because of the fabric i was unsure as to how to hem, so i just left it raw and because it doesn't fray it looked nice and neat.

I added a simple black waistband with contrasting baby blue sating bias binding belt looks just for an additional design detail that just gives a more masculine effect.


These images show the skirt in action as because there is so much excess fabric and circle cut there is so much fluididty and movement which would be great for a dance outfit or the bright lights of Strictly Come Dancing. 

In terms of working with this fabric, i found it really easy but the only thing i struggled with was that the more you worked with it the more it stretched which could result in extra fullness that you dont want.

I think this is such a basic cut garment but i could see this in the likes of Topshop for the summer as it is a staple item in any wardrobe either for work or day wear and if made in a glamorous fabric a great skirt to party and dance in.


Wednesday 21 March 2012

Week 6 - Trousers 2


Material : 100% Polyester Lace
Cost Per Meter : £5pm
Amount Used : 1m
Sourced From : Brick Lane Textiles


The thought of creating lace trousers really got me thinking as they would be see-through, But there is a trend for see through trousers as the likes of D&G have created lazer cut leather mesh shorts for men for S/S 12. As lace is a very light, delicate and "girly" fabric i wanted to use it for menswear and because i only had 1m of lace i had to compromise with the hem line. The final outcome i think works really well and i could see them selling in the likes of "Prowler" or "DV8 Soho" (gay lifestyle stores).


Instead of creating a pattern from scratch, i cut up an old pair of boxers from my wardrobe and took the pattern from them as i love the fit. Below shows the steps i took to create the pattern.

I found working with this material was, OK, but to make it presentable and finished the seams had to fastened neatly. So i opted to finish the boxers off using french seams which when trying them on created a smooth feel on the inside compared to the rough raw edge that i could have left it with.


To regain some dignity i double layered the front pouch section with a layer of black PVC underneath and i love the colour combination of the black and ink blue, dark but beautiful.


Instead of cutting a straight line through the pattern of the lace at the hem i really liked the selvage side of the lace where there was a scalloped detail which i think gave it a unique design feature. 

Original Old Boxers
Cut Waistband Off


Cut Along Seam Lines
Trace Round And Neaten Lines To
Create Final Pattern


Saturday 10 March 2012

Design Details - A Day In Central London


Week 5 - Dress 2

Material : Purple Polyester Chiffon 
Cost Per Meter : £2.50
Amount Used : 2m (additional red chiffon needed)
Sourced From : ????????????????


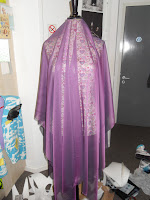
To completely contrast to previous weeks for this dress using chiffon was something totally new. Hearing from other groups in previous weeks that have used the same material they said that it was a pain to work with and you cant force it to do something that it dosent want to do. Bearing this in mind i completely scrapped the pattern i had created as it would have been fidely and frustrating to make. I opted to not use a pattern at all, which i was apprehensive about as it was like taking my comfort blanket away. I played with the drapes it created and the use of cutting on the bias to increase movement.


The above picture really shows well my "tying" method where i draped the material over a stand then slashed it to create strips of material that i then tied together like a friendship bracelet but on a larger scale to create this mesh effect. I was planning to create a whole dress using this method but it was deceiving at how much the fabric shrunk so i opted to just do a small section and make it a feature.


As i run out of the purple chiffon, i had to add in another section of red chiffon that i had in my fabric bin and i sewed it along the 2 raw side seams and then attached it up to the mesh section for 1 dramatic cascading drape. Because its sewn on the bias it drapes and folds beautifully and when in motion the wind gets trapped in it like a parachute.


In terms of fashionability i do think this could be desirable if the seams were properly finished off and a slip underneath was sewn in. 

I found it particularly hard to attache a zip in as it kept slipping around. But since doing it i found out that you can use paper to stop the slippage which i will try next time.


The images above show the stages from start to finish of the mesh section at the back/front.